Last post I gave a hint about the next project I was starting to work on and the following is an update on how that project is going. I started out with this gorgeous hand dyed warp thread I got from Robinjedmundson on Etsy.
 I decided it would be cool to make a purse using this colorful rayon warp by combining it with a cotton weft. For the weft I used a mercerized cotton flake yarn. I felt that this combination of fibers would give the cloth enough body to make a purse.
I warped up the loom with a combined twill pattern using a 15 dent reed. The loom was warped with 130 threads (this included the 2 float threads).
 Because I had already done this pattern once with the same number of warp threads for another project …
 I just tied the new warp onto the old warp and pulled the threads through the reed and through the heddles instead of having to thread all of them from scratch.

I wove using a mercerized cotton flake yarn in a dark teal color for the weft.

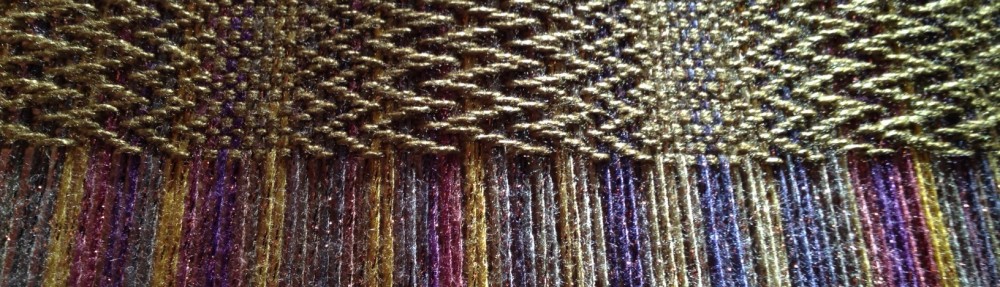
I really love the play of colors in this dyed warp combined with the dark teal weft.

Here is a close up picture of the interplay of colors in the pattern.

The Weaving progressed very nicely, and the fibers were a joy to work with.

The colors did not show up very well in this picture but this is the piece as it was being taken off the loom.

And this is the piece laid out before finishing.

Once I did the finishing wash, dry and cutting off of the spliced in weaving tails, the finished cloth measured about 7 inches wide, and 64 inches long. I cut the fringe on one end 4 inches long and at the other end I cut it 9 inches long.
The end of the cloth that has the shorter fringe will be the top flap of the purse, and the longer fringe will be at the bottom of the purse.
I decided to add some copper and beading embellishments to the shorter fringe that will be on the top front flap of the purse.

First I strung some beads and added them.
 Then I flattened some pennies and textured one,

domed another and added more copper accents by twisting some copper wires and flattening them.
I am also considering adding these items……

Using this purple perle cotton, I thought I would add these beads by sewing the thread in and out of the fabric so that it shows through on top while tacking down the beads at the same time. I also though I would use some of these purple beads (right side of the picture) to add a few more strands of purple accents in 2 or 3 other places along the fringe.

I feel the purse is progressing nicely and I have several ideas already on how I want to piece it together. I don’t have very much of the warp thread left, but there is enough to add some into the inkle band that I am going to weave for the purse strap.
….So for now, it’s back to the loom….
Thanks for dropping in, hope this project inspires you to make something beautiful today!!
Until next time…..

….I wish you Peace


