SOMETHING NEW….

Turning plain white Tyvek paper into these colorful beads!!

img_0654

My latest project has been making these beautiful paper beads.  Just the kind of project my happy painting fingers were ready for!  I had been watching several videos online about making these beads and decided I definitely wanted to make some, so I ordered 20 sheets of Tyvek paper from Amazon.  I did see that several of the people in the videos also used Tyvek envelopes that they had saved from something they received in the mail or from a friend that had recently put insulation on their house and had some of the extra tyvek paper.  I was very surprised at how strong this paper is, I couldn’t even tear it!  But it did submit to the coaxing from my heatgun to make some very interesting shapes! 

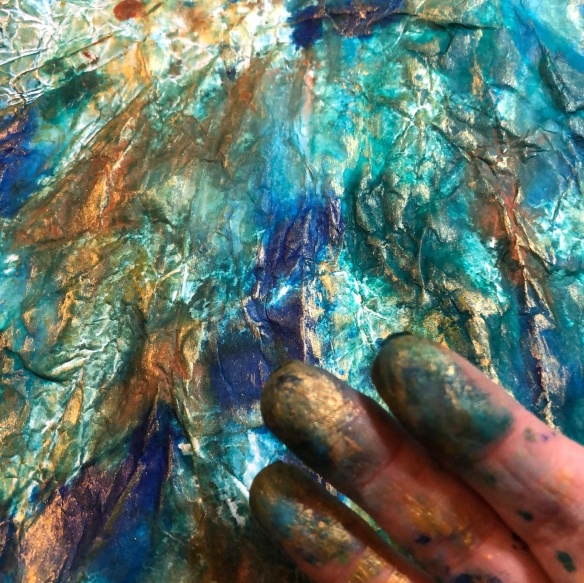
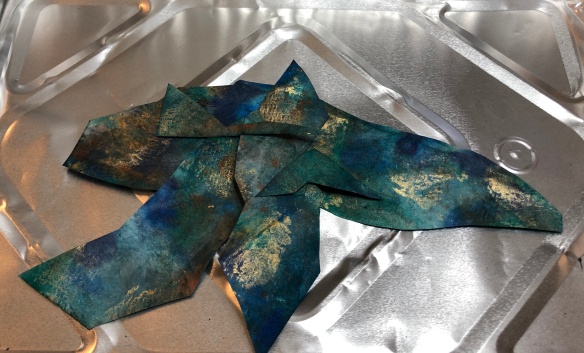
To begin making these beads I first crumpled the paper up, then flattened it back out for painting.  I knew that would add some dimension as I painted these white sheets of Tyvek with several colors and layers of acrylic paints.  I made sure to add in some glitz by painting on some metallic gold paint as you can see from these pictures.

0b2b052d-5481-43b3-8217-1a122ae2208c

f5d153f0-d5a3-4e1c-ad37-7adbdd9bbb1d

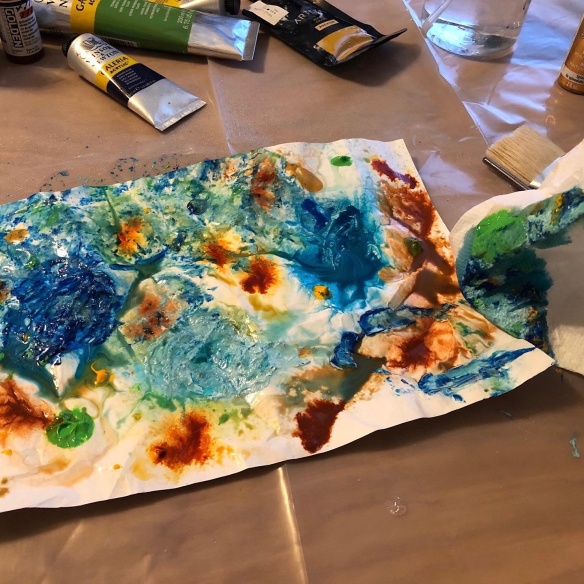
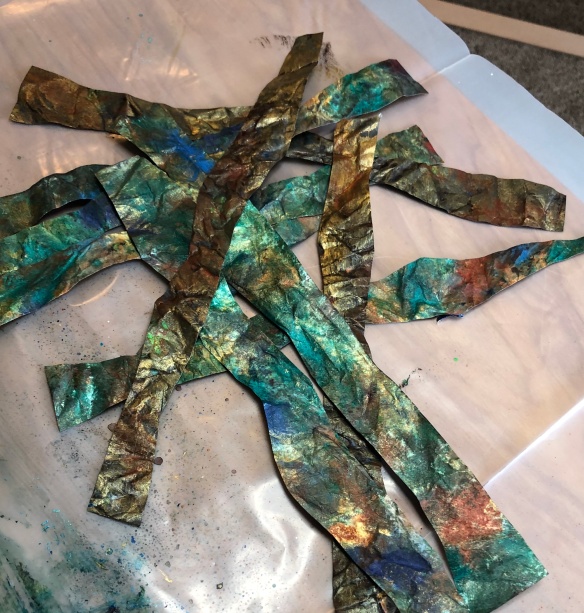
After I painted the front side I let it dry and then I also painted the backside.  Once the paper was completely dry on both sides, I cut it into strips.  Some of the strips I cut into long triangle shapes, some I cut into other various shapes and sizes.

img_0522img_0616img_0575

Then the fun began!  Using only one strip at a time I wrapped the painted paper onto a dowel ( I used several sizes of dowels to get the different sizes of beads).  Once the strip was wrapped onto the dowel I pinned it with a straight pin to hold the strip of paper in place.  

img_0600

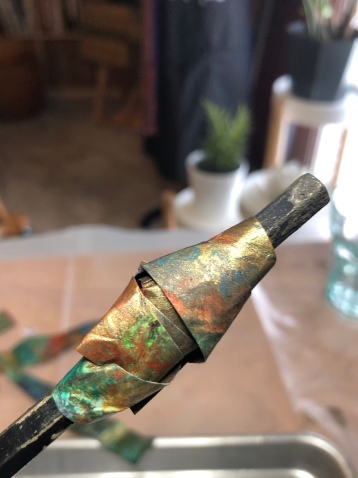
Once I knew the paper was well secured I used my heat gun to begin “melting” the paper strip to itself and help it to create textures and curls in the “bead”.  

Here are the beads that I ended up making…

For the beads pictured below I laid beads on the paper that the strips for them had been cut.  As you can see the color of the beads can sometimes look very different from the way that the paper had been painted.

As you can see from the pictures I made a lot of beads!  The process was very fun and addictive!   It was always fun to see what the result would be from the heat being applied to the painted paper and to see what the shape of the bead would be from the way I had cut the strips.

I am already picturing all the fun things I want to make using these beads!  Definitely jewelry and I have a few other fun things in mind that I would like to try!

 I hope you enjoyed seeing how these beads were made and will drop back in for a visit when I post the pictures of the resulting art pieces made from these beads!

Until next time……

DSC01768

…..I Wish You Peace


Hand Painted Jewelry

Impressionist style painting……

img_8604

I love the freedom that modern impressionistic painting with fluid Acrylics and Alcohol Inks brings to the canvas.  The abstract designs lend themselves to so many applications.

Recently, I have not only painted in this style to make artwork to hang on the wall, but have also been making other art pieces like these jewelry items…

img_0146

I have been making necklaces, earrings, rings and even bracelets!

img_0286

Some of these were painted using acrylic paints and some were made using alcohol inks.

I love the many feelings and styles of this jewelry so I decided to name the lines of jewelry that were made from each of the particular canvas.  Here is a list of some of the names I came up with….

Slice of Nature, Mesa Verde, Gold Rush, Dragon’s Lair,  Under The Sea and Autumn Splendor.

img_0385

Here is an example of how the process to make these beautiful pieces begins.  First I must decide the additives I will use with my acrylic paints to get the desired effect in my painting.  This took me quite a while to work out my favorite 2 or 3 formulas.

Once I decide on the formula, I then decide whether the application of the paint will be on Canvas or Yupo paper.

 Once I even took some of the leftover paint and splashed it on these little cups.  No paint ever goes to waste!

 Here is an example of how some of the paintings turned out before making them into jewelry.

The process of making the jewelry is a test of my patience for sure as once the painting is finished I have to allow the artwork to cure for 2 to 3 weeks.  It’s hard to have to wait that long to see my finished pieces.  Once the paintings are cured I then clean and dry them which takes another 2 to 3 days.  To give the artwork a beautiful finish I add 3 coats of sealer to them.

img_9628

The above picture shows some of the pieces I made using Alcohol Inks, these are part of my Autumn Splendor Line.

img_0285

The above bracelet with several round pieces is from my snap jewelry.  I have made additional pieces in a variety of colors, so the artwork on these is interchangeable.  Meaning a person can take these 5 round pieces off and put different colored snaps in their place.   Being able to change out the round pieces makes this jewelry very versatile, I love that aspect of this style.

This is how the pieces work.  As you can see it is a lot like an actual snap.  And it really is that easy to change them out!  How fun is that?!

*******

Another  project I just finished were my new business cards……

I am so please with how they turned out!!  What do you think??

******

Well it’s time to get back to work on my new studio spaces, so I will end this post.  I  look forward to our next coffee break and bringing you up to date on the latest adventures here at the Art Pod.

Until next time……

….I wish you Peace!


FRIENDSHIP…..

Friends Are The People Who Know The Words To The Song In Your Heart……

IMG_2527

I am so fortunate to have had many friends in my life that definitely know the words to the song in my heart.  And something that makes me very sad is when one of them is going through something difficult in their lives.  You know that you can’t “fix” it for them but all the same you somehow want to help build them up and encourage them that they will get through this hardship.

Today I wanted to share a weaving project that was meant to do just that.  A friend of mine was going through something tough and was feeling pretty discouraged and I began to try to think of something that might cheer her up.  

I decided I wanted to try to weave something colorful and cheerful for my friend.  I was just finishing up a project on one of my floor looms that had some leftover dark brown cottolin warp threads, so I decided to try an experiment.  This purse was the result of that experiment. 

IMG_2529 

 I knew my friend loved very colorful things so I knew that the purse would need to have lots of color.  I went through a bunch of leftover yarns that I had from other projects and made a pile of them by my loom and then began weaving random  patterns.    This is how it looked on the loom during the weaving process.     

IMG_2451

There was no rhyme or reason to how I laid the colors or patterns out, this was just random treadling and colorful playing in my threads.

IMG_2449

I really did not even try to repeat or keep track of any of the patterns I was weaving.

IMG_2442

Once I felt like I had a big enough piece woven to make a small purse I stopped weaving.  Of course I also stopped because I ran out of warp 🙂

At this point I really wasn’t quite sure if this was going to look like the cute little purse that I had envisioned.  I did the finishing wash and waited for it to dry to see if this was going to be a big enough piece to make the purse.

IMG_2452

During this same time period I had been experimenting with dyeing some silk scarves.  I went through some of my finished pieces and picked this one to use for the lining of the purse.


image

As I began the construction of the purse I decided it definitely needed some

IMG_2525

embellishments, so I added the mirrored and hand buttonhole stitched circles and the scroll that I had made by crocheting together multiple threads.  I added a button and closure threads that had been braided and sewn into the flap.  

I twisted a bunch of the leftover weaving threads together, putting a knot at each end to make a tassel, and hand sewed it onto the purse for the strap.

IMG_2531

Before sewing the lining into the purse I stamped it with this friendship saying and the music notes on each side.   I heat set the printing to make sure it was permanent.  

IMG_2533

My experiment was now complete and I was anxious to wrap it up pretty and give to my friend.  

IMG_2529

I was so glad to have something to give to her that I had handmade to brighten her day.  She is still very much in my daily thoughts and prayers.  Even though we now live many miles apart we still keep in contact and are still a part of each others lives.   

I hope this article inspires you to make something beautiful, and treasure your friendships! 

Until next time……..

DSC01768

….I Wish You Peace.


THE START OF A NEW ADVENTURE…..

ART POD STUDIOS moves to Nashville, Tennessee!

img_8735

It was hard to believe…..

img_9820

…it was finally all packed!!

img_8741

And we were headed to our new home and studio space in Nashville!!

****

AS YOU CAN SEE from this picture of our new place in Nashville, it is going to be quite a bit of work transforming some of this space into studios.  This is the area where Studio I will be.    

img_8066

We are slowly making progress on transforming this into an area where I will be doing a lot of weaving on my floor looms.

img_8210

Once the painting was done we started moving supplies and equipment into the studio.  It still needs lots of tweaking and organization to get the studio up and running but I can now envision the metamorphosis of this studio into a great creative space.    

img_8209

More shelves put together and getting lots of fibers unpacked.  

img_8207

And would you believe it more fibers!!

img_8827

I’m sure like many other artists I am surprised at just how many fibers and supplies I have in my stash!  

img_8287

It’s been fun going through all this stuff and being reminded that I have some really cool books and videos I had almost forgotten I had.    I love rediscovering them all over again!

img_8284

I still have a long way to go in getting this Studio space ready to use but I am feeling like I am making lots of progress.   Once it is finished I will post some more pictures of the finished room.  

img_8286

I know this Studio will be in progress for quite a while yet as I am feeling that I may need to repaint the room again.  I painted it with a white medium quality paint and instead of it looking white it looks Peach.  Not at all what I wanted!  So back to the drawing board as they say….  

I have started work on Studio II and it is almost finished.  Next week I will show the before and after pictures.  I’m definitely loving the way it turned out!!

***

Thanks for stopping by and taking a look into what Art Pod Studios is up to these days.  I will soon have some postings on what art projects I have finished recently.  

Until next time…..

DSC01768

…..I wish you Peace.