Adding Beads To Handwoven Cloth

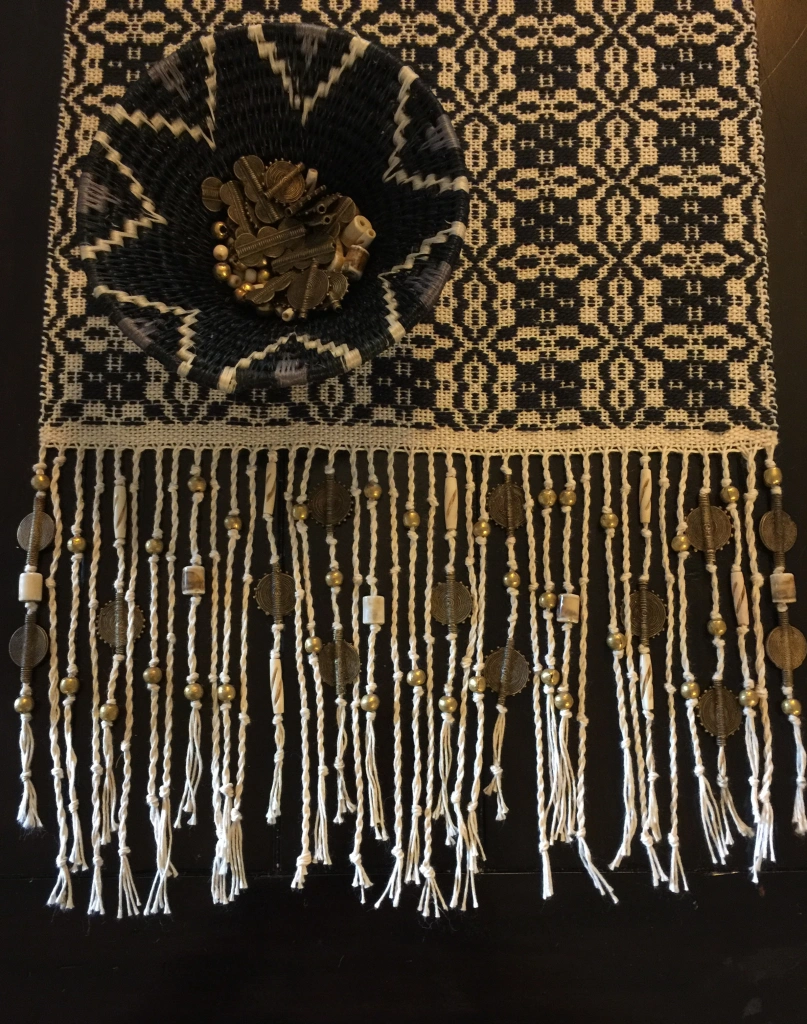
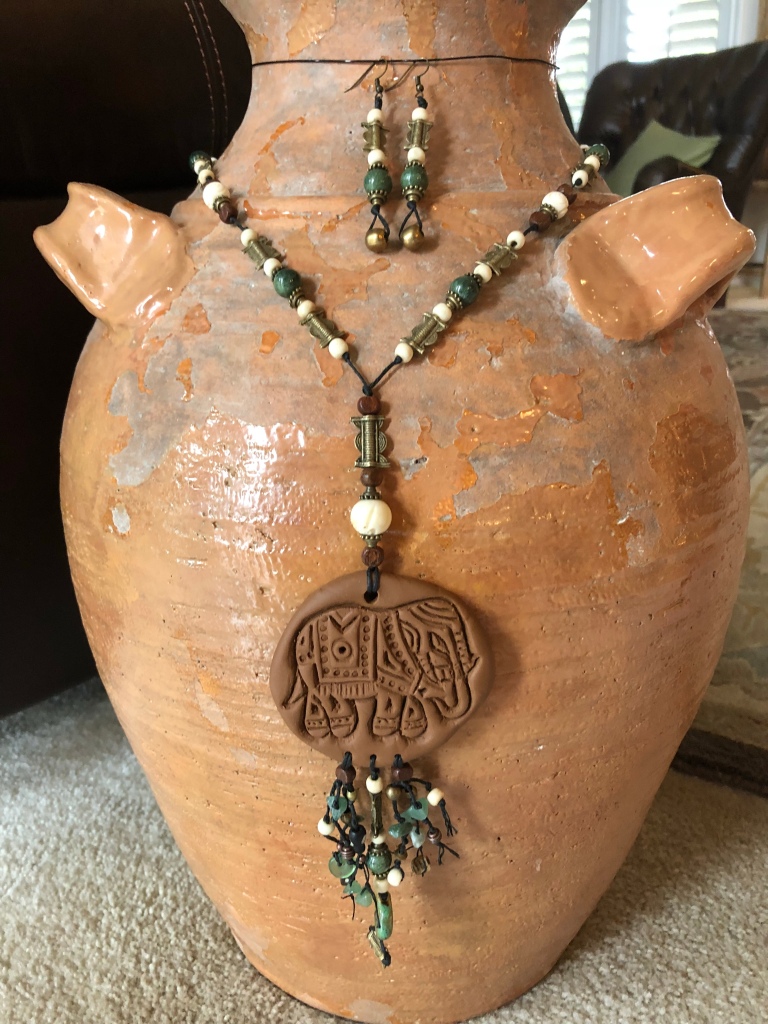
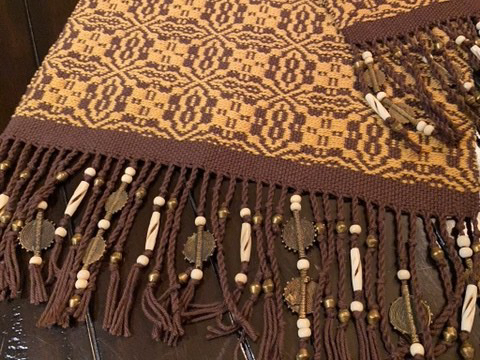
As a weaver and an artist I love being able to add custom touches to my art that add a bit of pop to the finished piece. After I finished weaving this overshot table runner I really wanted to take it up a notch by adding a special artistic element to the piece. After much research I came up with these handmade fair trade brass beads from Africa.

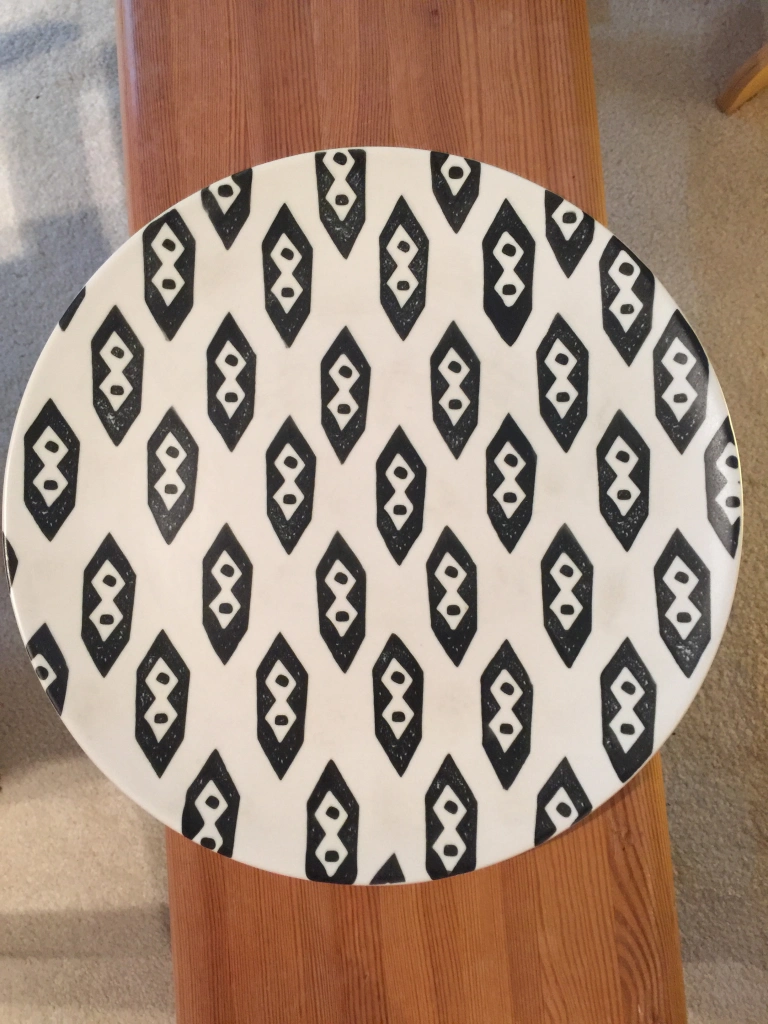
This plate was the inspiration that started this whole project! I loved the simplicity of the design and color. As you work your way through the slide show above you can see how the piece progressed and how it looked when it was finished.

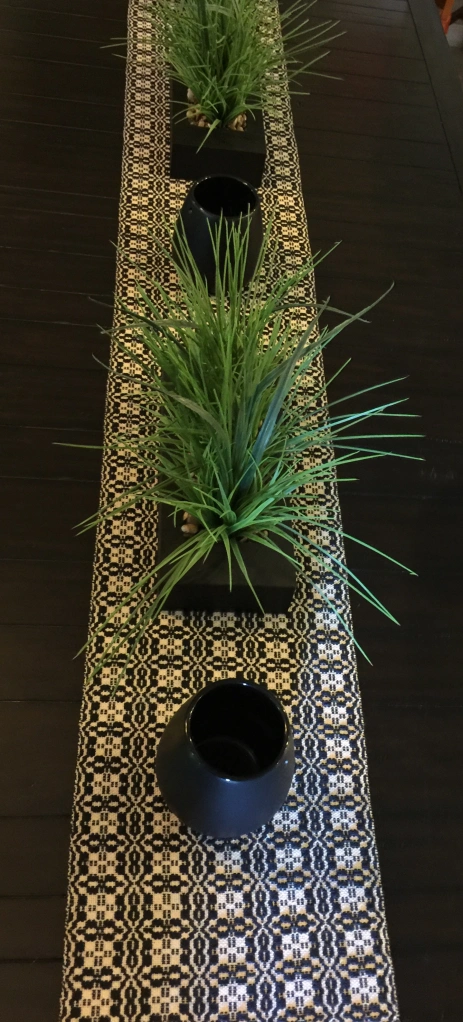
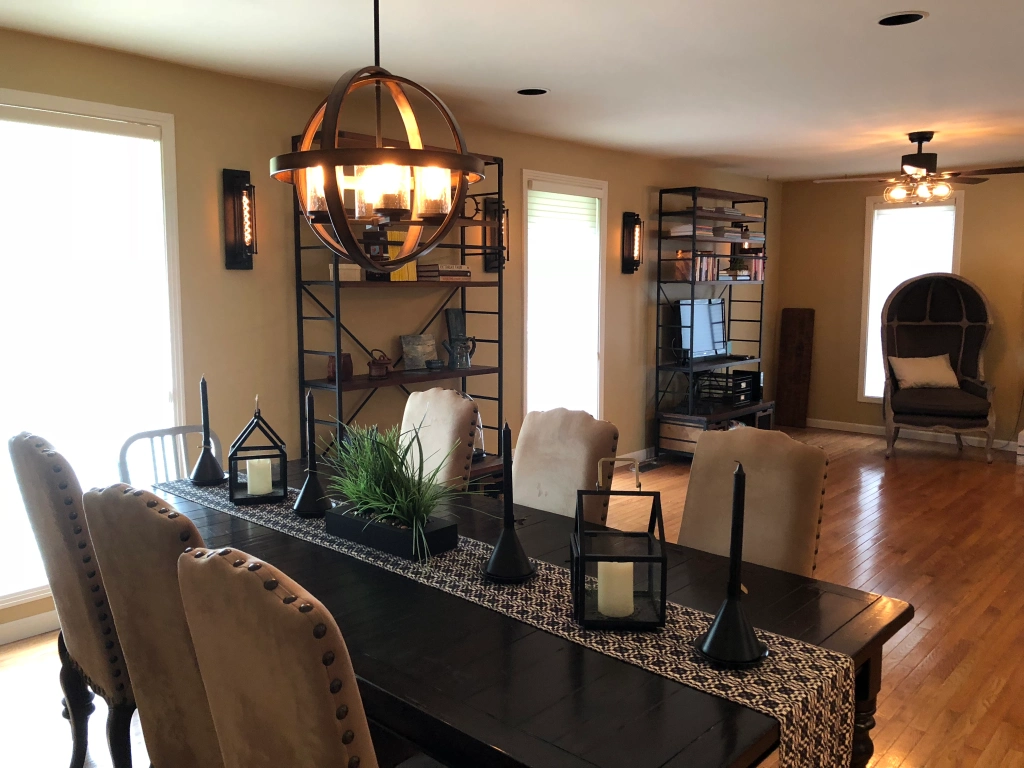
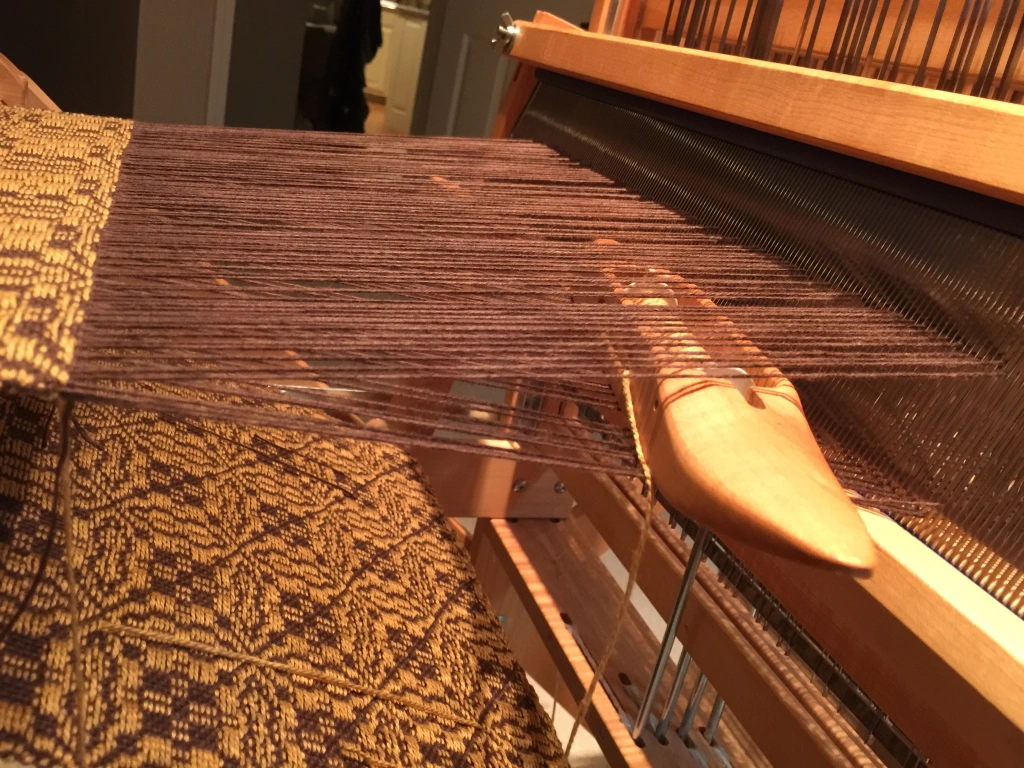
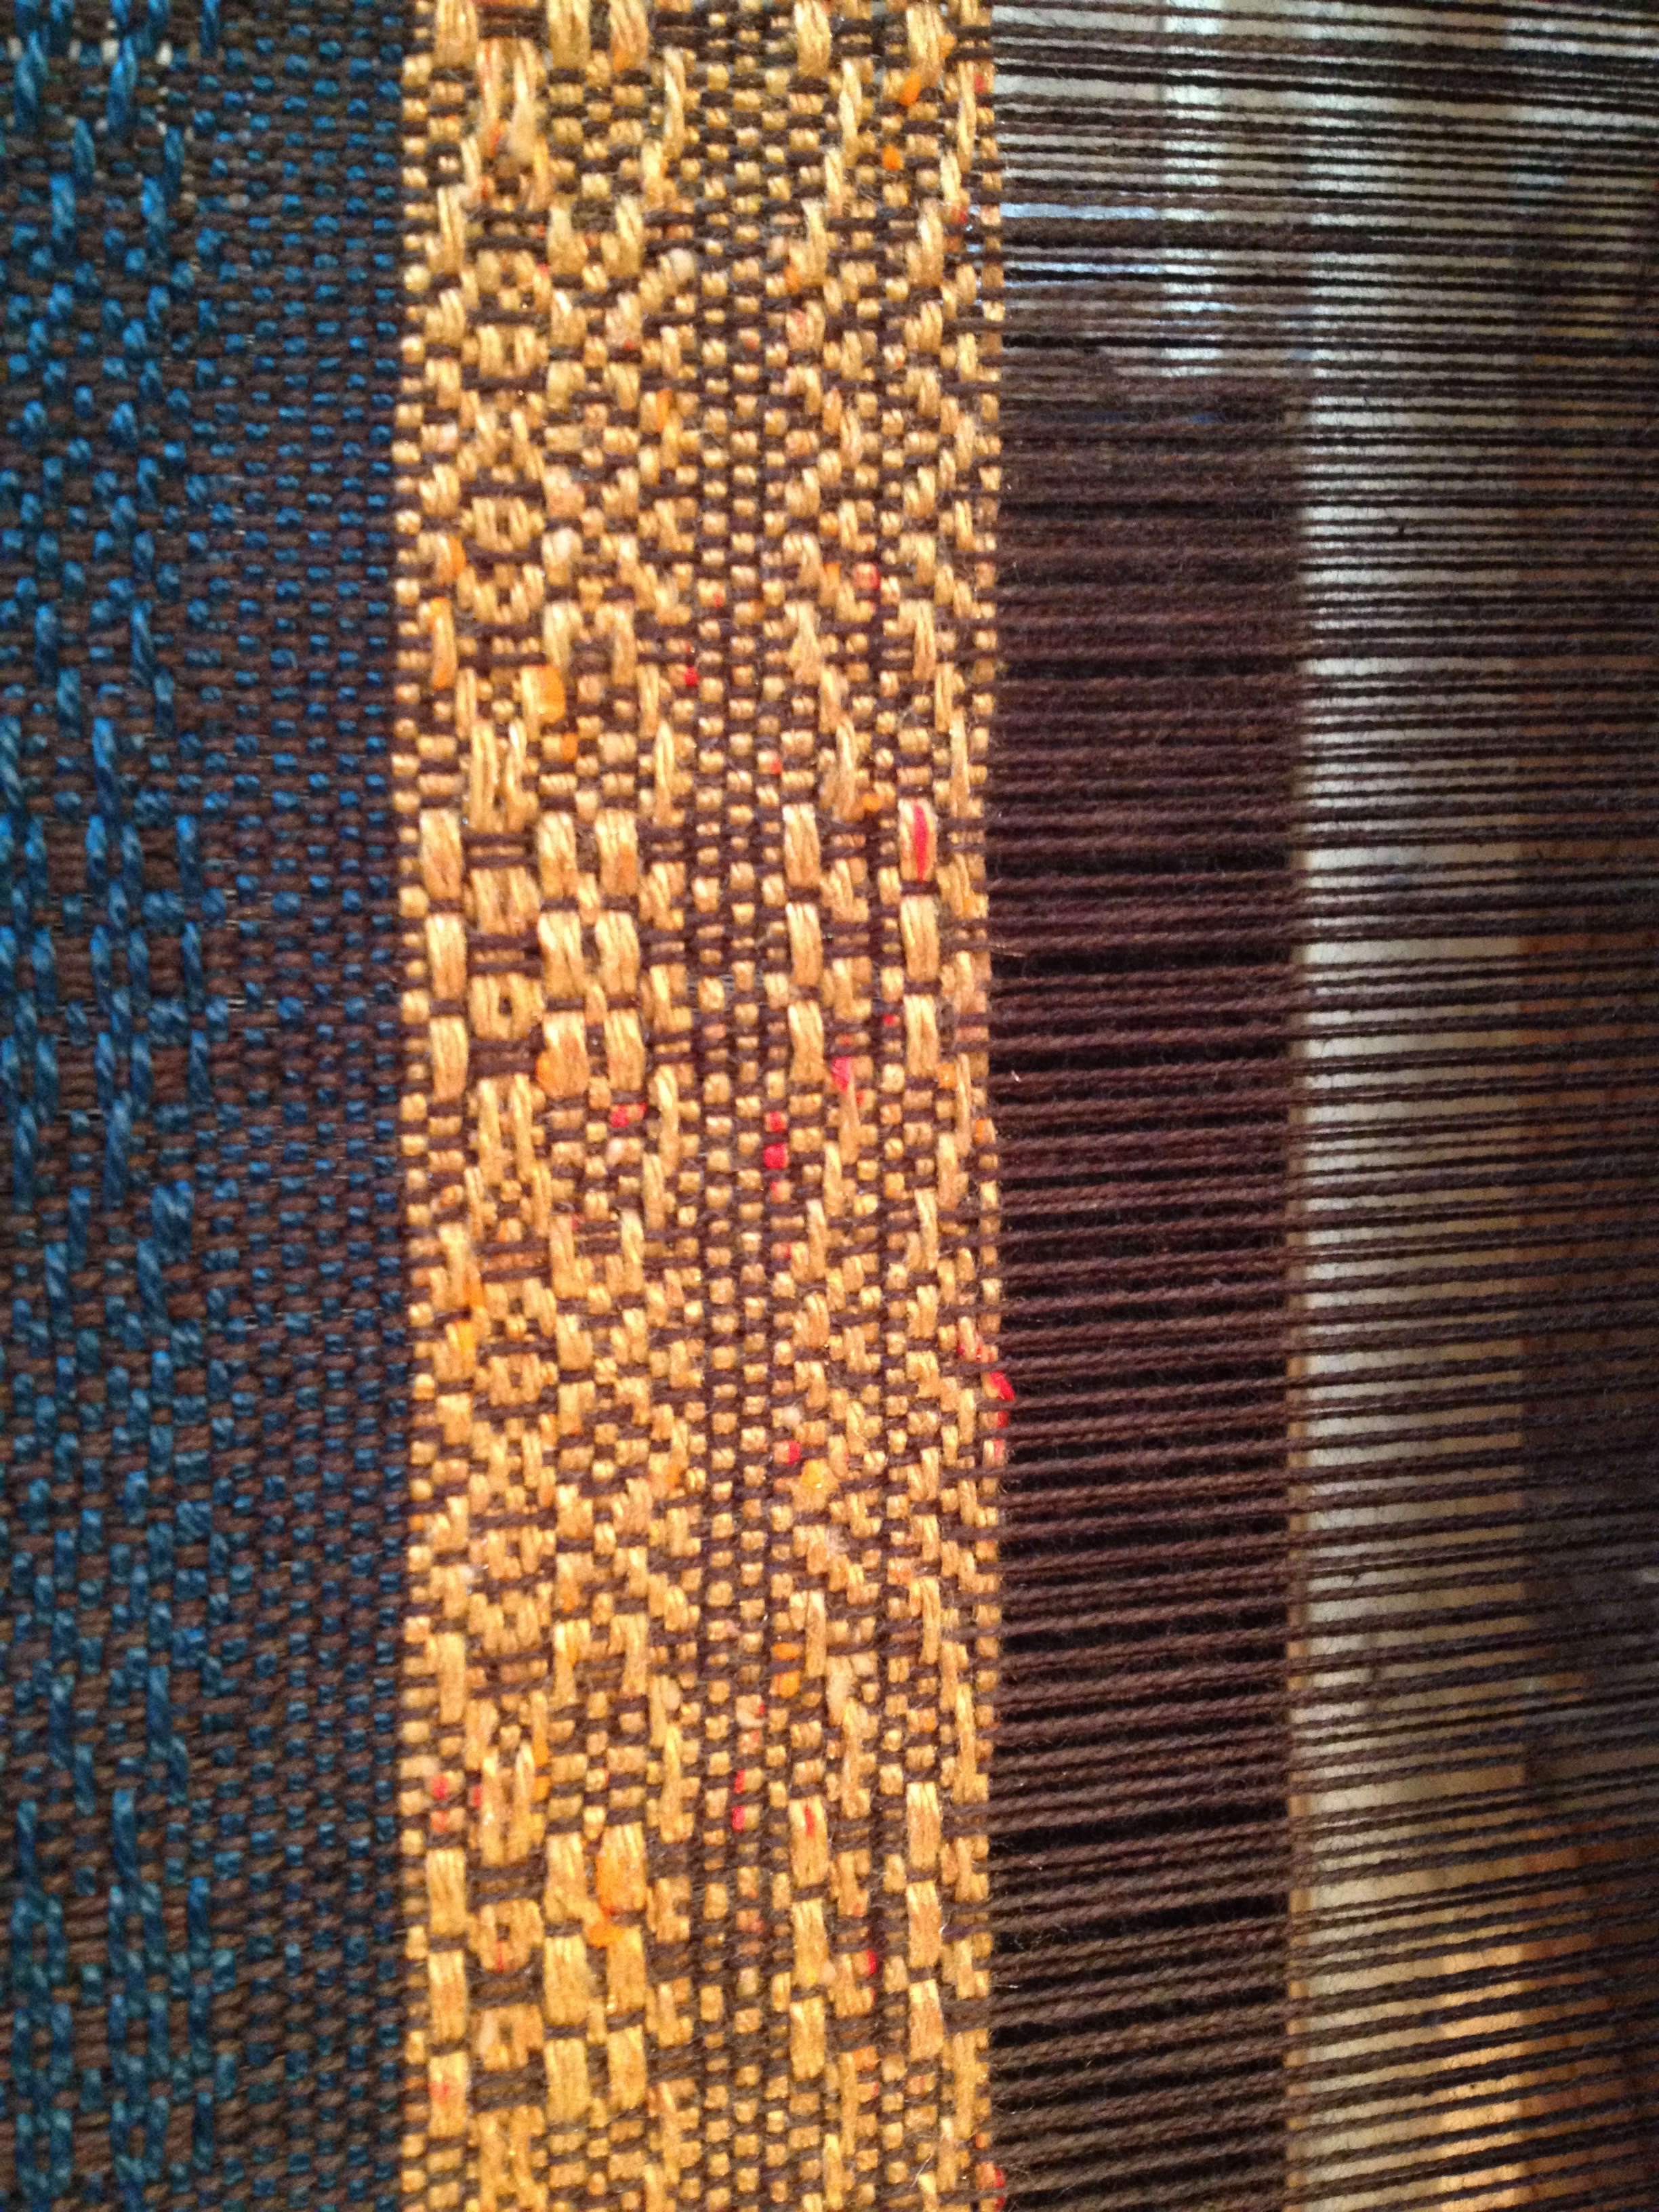
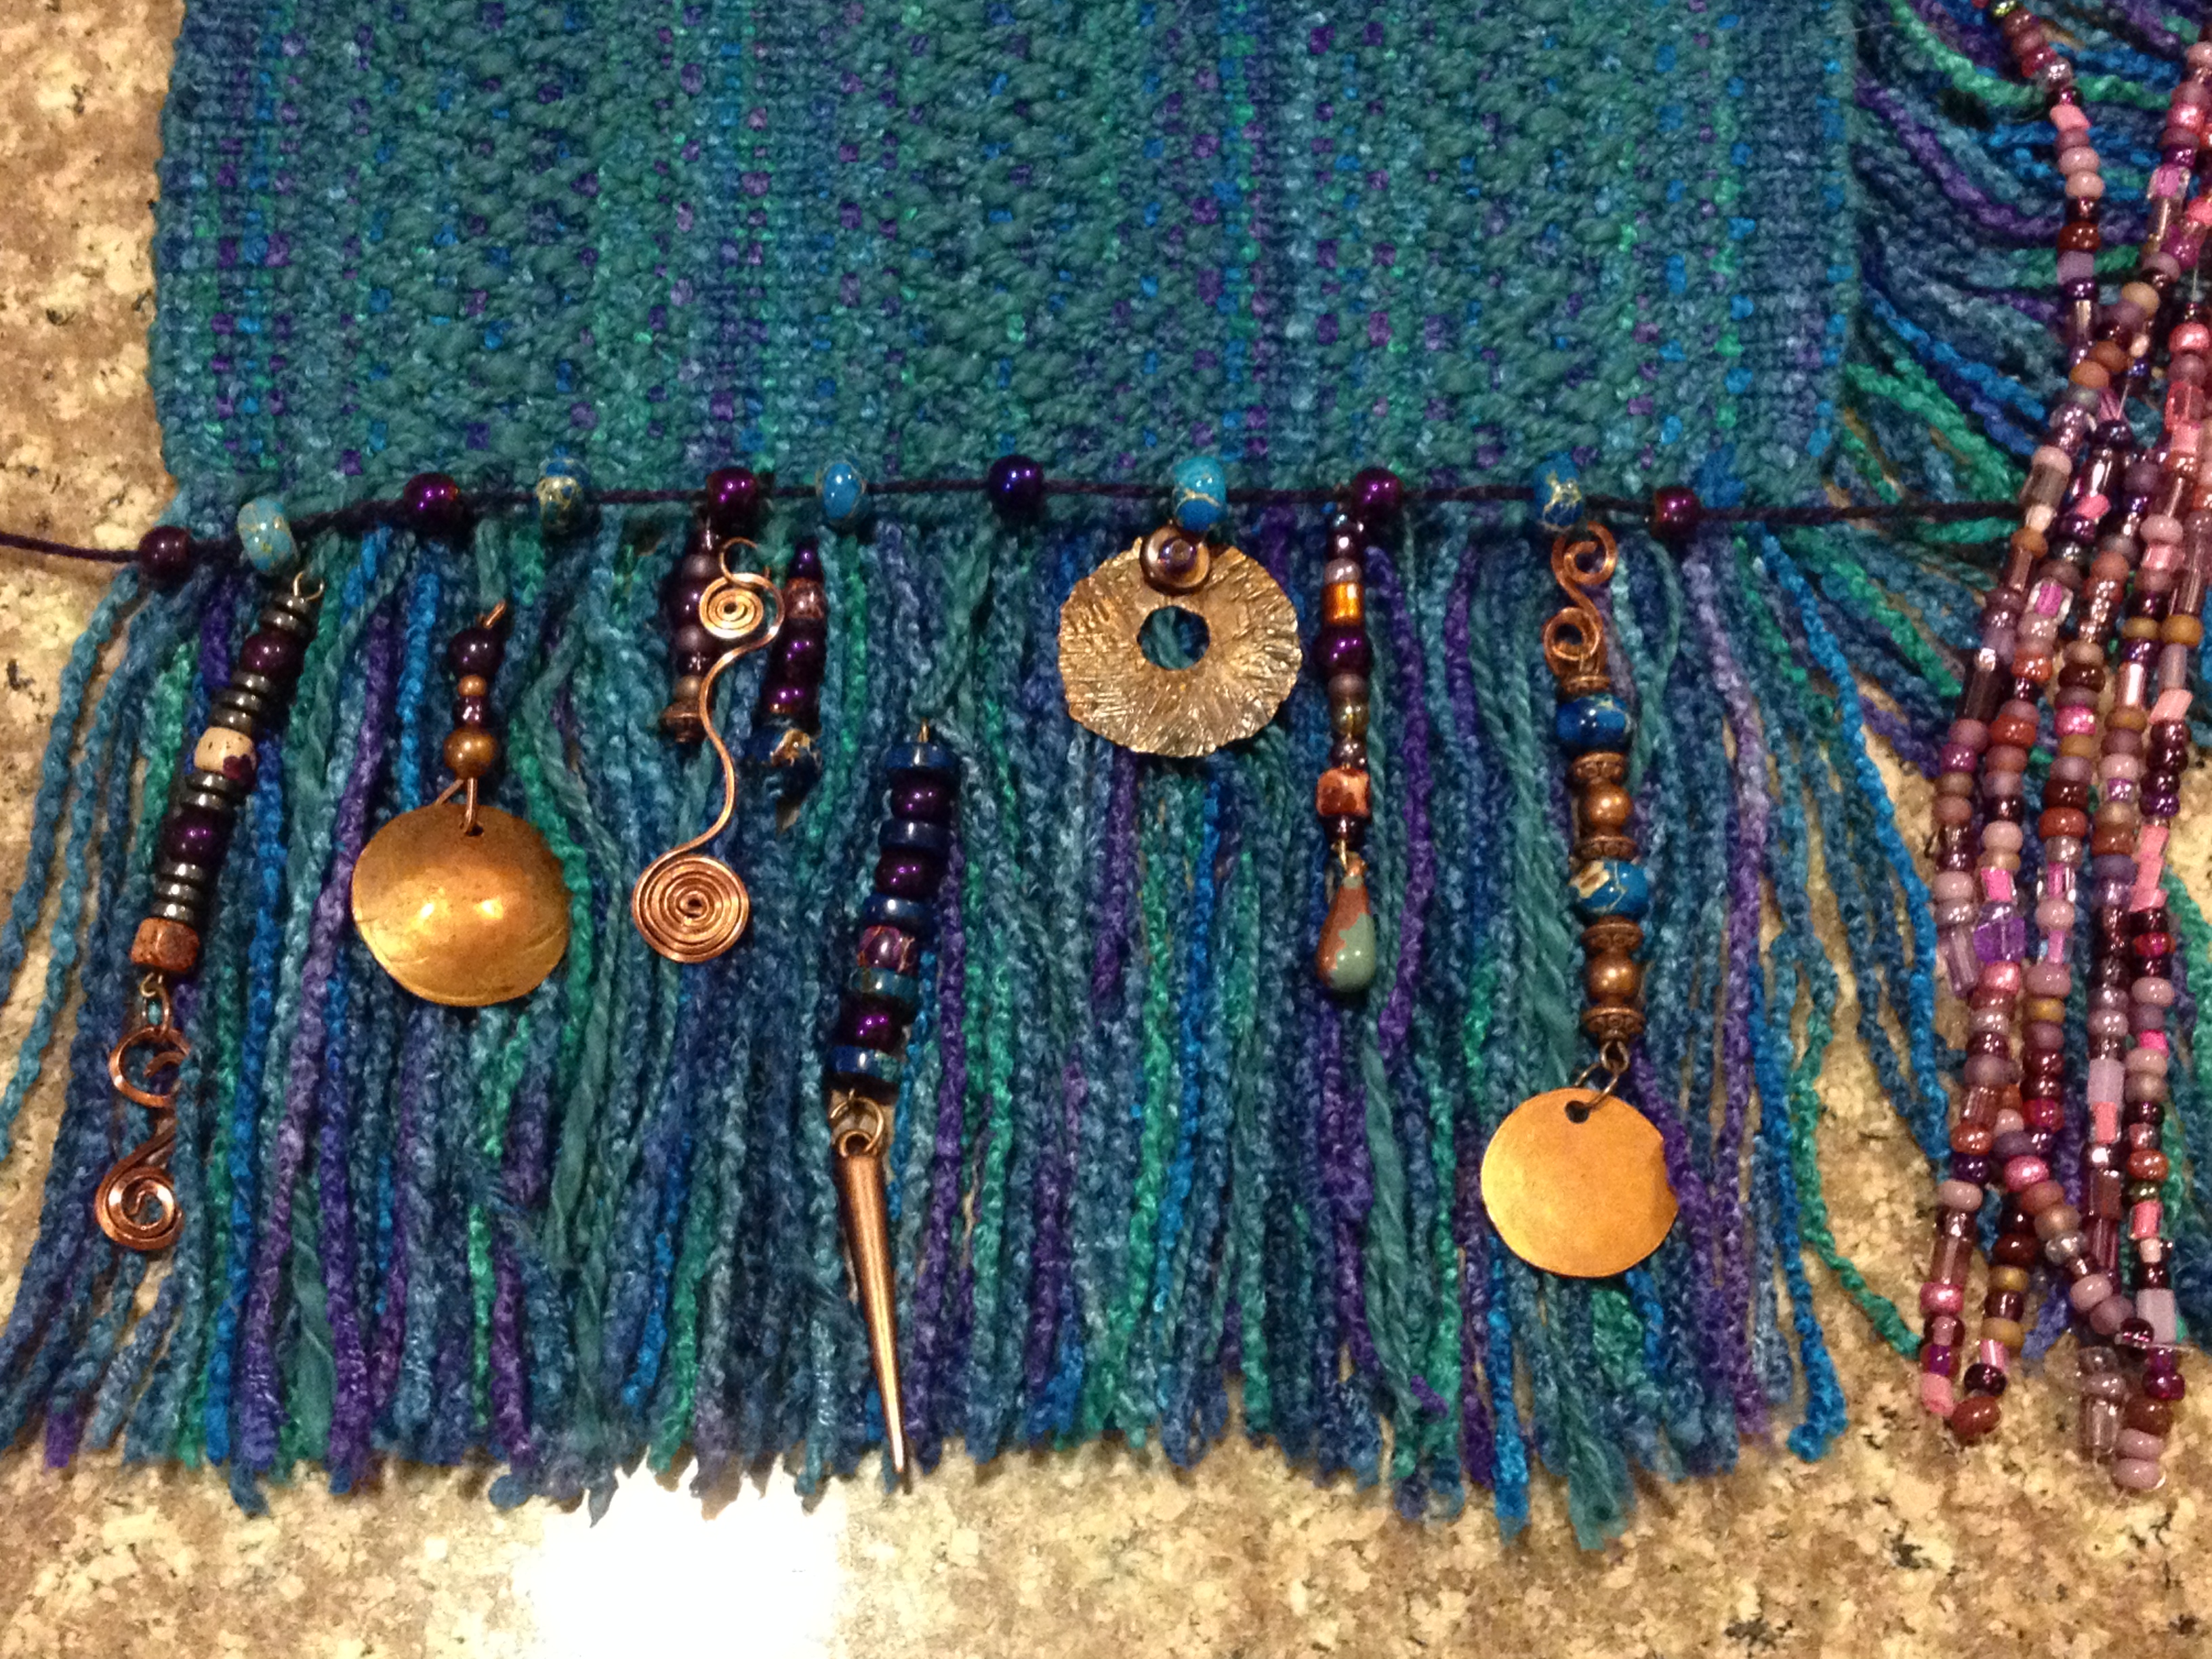
This table runner was woven on one of my Schacht Floor looms. It was woven using 4 shafts and using the overshot technique of weaving. I used Cotton and linen threads to make it a sturdy and hardwearing runner for many years to come. Once I completed the weaving portion of this project, I knew that I wanted to add a little something more to the design. That’s when I came up with the idea of adding some beads to the runner. I didn’t want to add just any beads though, I wanted something that had been handmade and would compliment the finished runner. When I came across these handmade brass beads on Etsy, I knew they would be perfect!

When the beads arrived in the mail I was so excited to get started putting them on the runner. I thought it would be a very simple thing to do, but boy was I wrong! Many of the handmade metal beads needed to be reamed out so that I had a clean hole going all the way straight through the bead, that was task number one. I tried using a beading needle to pull the end warp threads through the beads but that didn’t work very well and I needed to find another tool for adding the beads. I finally realized that dental floss was strong, but thin enough that it would fit through the narrow opening in the beads. Once I knew I had my beads and tools figured out I sat down and drew out how I wanted the bead design to look going across the ends of the fabric. At last, it was time to start adding the beads!

Although it was a very long and tedious task I loved the end results! I soon realized it took me just as long to put the beads on both ends of the table runner threads as it had taken me to weave this piece. I feel the end result was worth it though and I love this stunning piece of art.

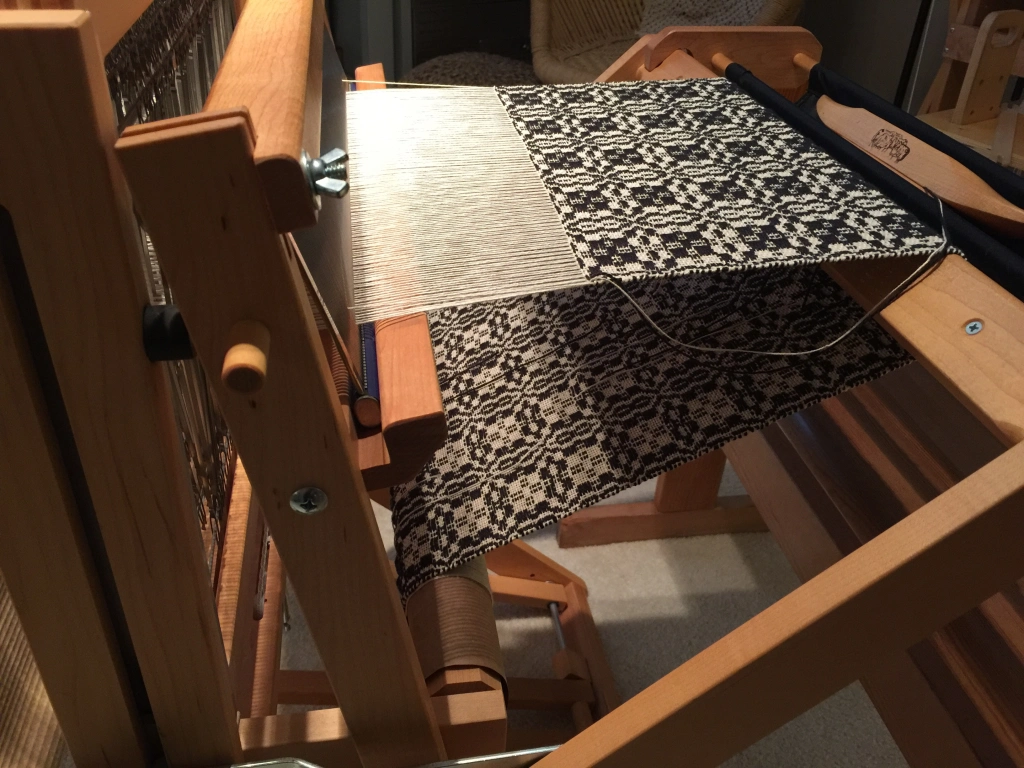
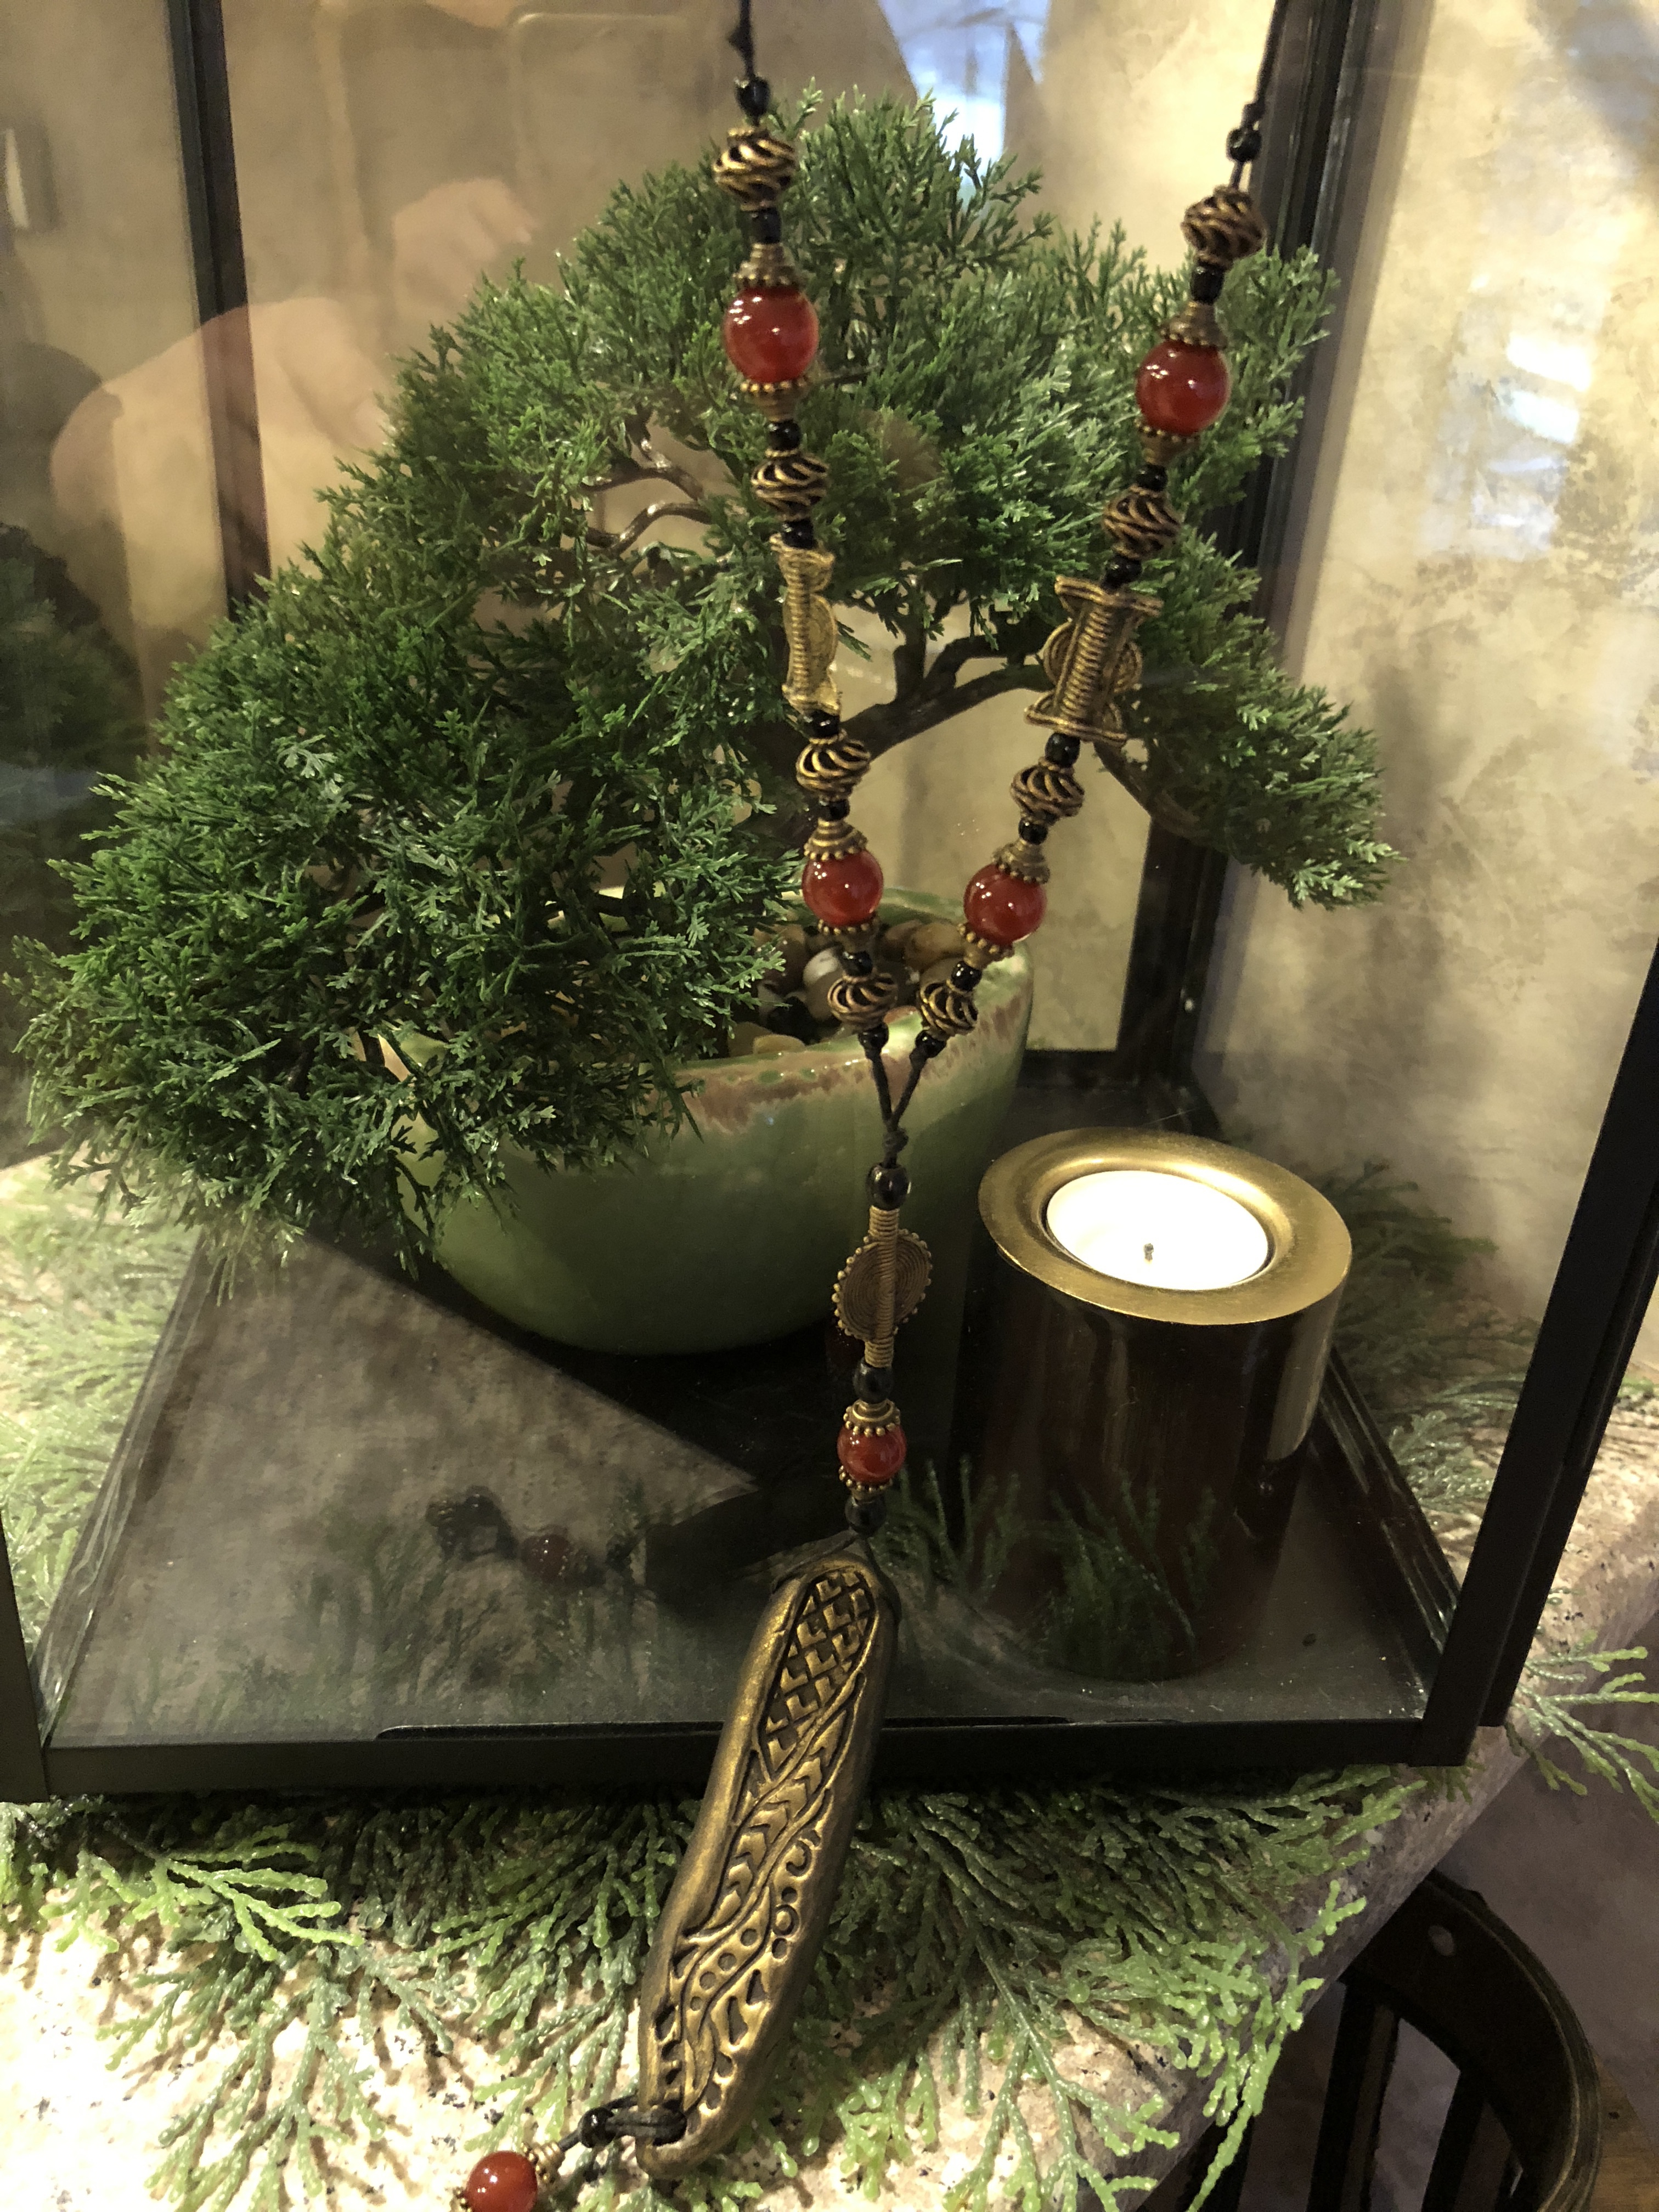
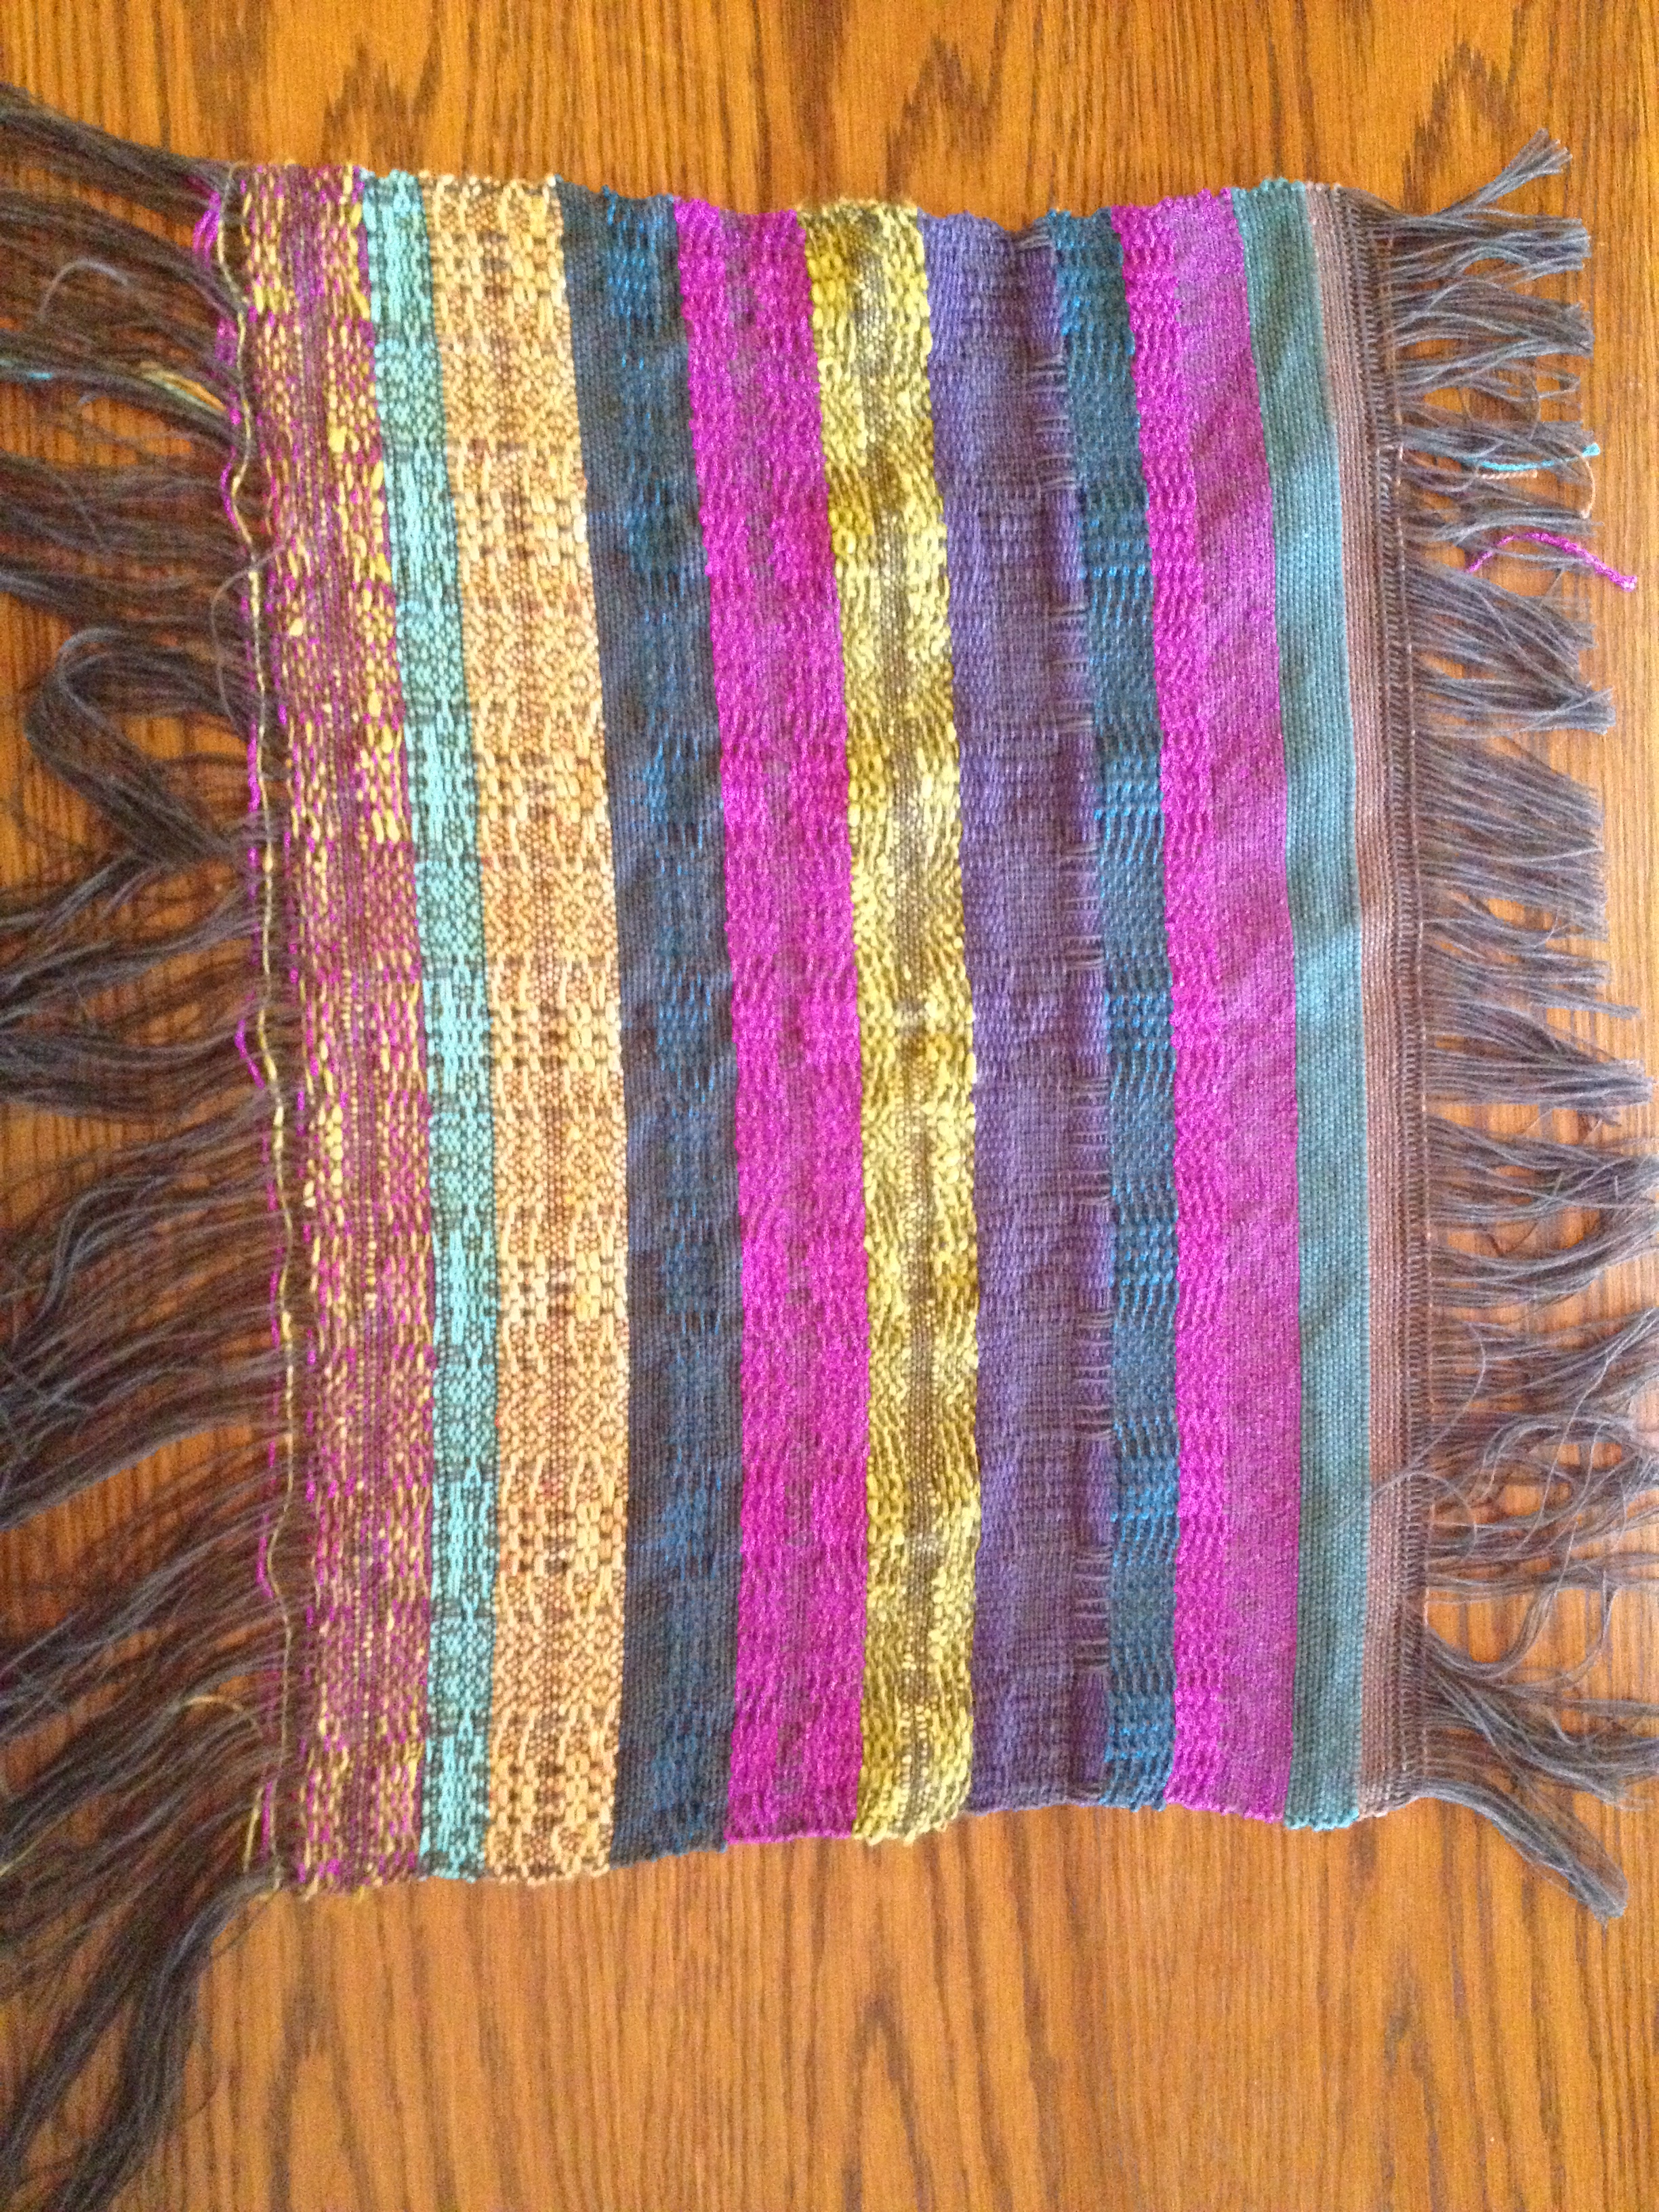
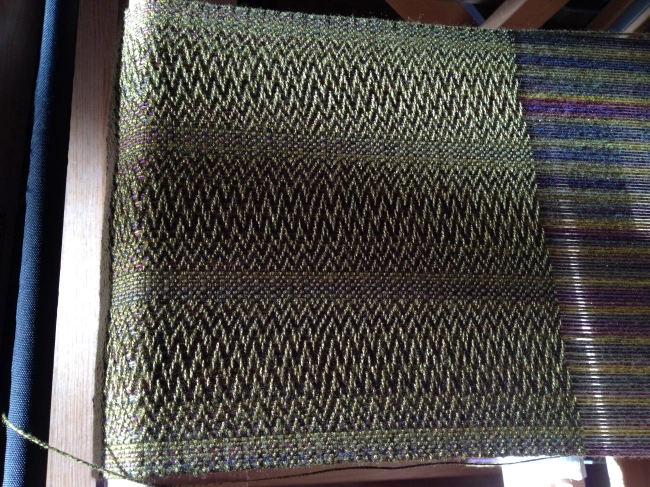
I decided to make several other runners using the same beading technique and below are several pictures of those additional handwoven pieces.

Thanks for dropping in to see what art I have been weaving up lately, hope you have a great weekend! Until next time……

…..I wish you peace

Handmade Jewelry From Leftover Beads…

img_7935
In my last post I mentioned that I had made a few jewelry pieces from the extra fair trade brass and bone beads leftover from my handwoven runner projects.  I thought my readers might like to see some of those pictures so here they are…

img_7934

I made these earrings and then made this earthy necklace to go with them.  

img_7840

The round elephant disc is made from FIMO clay that I impressed using one of my rubber stamps.   Recently I added a light layer of off-white paint to just the elephant part of the clay and then burnished it with a light layer of antique bronze coloring.  I’ll try to post a picture of those changes when I get a chance to take a few more pic.   

Pictured above are several additional sets of earrings that I made.  Two of the pairs of earrings have lava beads in them.  I added the lava beads because they are porous and I can add a drop of essential oil to them.  It’s like having a little therapeutic uplifting scent added to the back of your ear.   

I  made this necklace to match the above earrings.  Once again I used FIMO clay  for the bottom focus part of the necklace.   This time I added a little bit of bronze color to the stamped design in the clay.  This is one of my favorite jewelry sets to wear, and since the colors are neutral these pieces go with lots of different outfits.

img_8011

This is just a quick post to show you some of my handmade jewelry.  My next post will include pictures of the other runners I made and embellished with the fair trade brass and bone beads.  

Hope everyone has a great weekend!  Until next time….

DSC01768

….I wish you Peace

A Little Inspiration Goes A Long Way….

One of my recent overshot style weaving projects started with this tribal shield inspiration picture I found on Pinterest.

img_6833

Because I was so drawn to the beautiful earthy nature of this shield, I knew I just had to weave a table runner using similar colors.  I wondered if I could mimic the same feelings of texture in the personality of the shield.   That became my artistic challenge, to bring the look and feeling of this piece to a handwoven table runner. 

As I began to plan the structure of the piece I knew that using an overshot technique for my weaving would probably give me the visual texture that I desired.

 The overshot technique in weaving is accomplished by using two different thickness of thread alternated in the weaving rows.  The pattern row is made using the thicker of the two threads and usually skips over several threads to achieve the desired pattern that you are weaving.  The thinner of the two threads is woven across the warp before and after each thicker pattern thread to “lock in” the pattern thread.  The thinner threads are woven in tabby (weaving speak for plain weave).  

I feel that using the overshot weaving technique helped me to capture the textual feeling I wanted for this runner.    Here is how the project progressed and a list of the yarns that were used.

img_6841img_6844img_6848

For the warp threads (threads going from the front to the back of the loom) and the tabby threads I used a dark brown cottolin yarn.  Cottolin yarn is made from 60% cotton and 40% linen.   The pattern thread used was an 8/4 cotton yarn.  The 8/4 refers to the size of the yarn.  The cotton yarn was about twice as thick as the cottolin yarn, thus the raised overall textural look and feel in the runner.

img_6888-e1578446305792.jpg

With the color pallet and types of yarn I chose and using the overshot technique, I felt like I was able to achieve the look that I wanted for this project.  What do you think??

Half way through  my weaving  I decided I wanted to add a little something special to the piece that would bring the cultural influence in the tribal shield that inspired me to create this project to begin with.  As I searched for that special something, I found a vendor on Etsy that imported fair trade beads from Africa.   Handmade metal and hand-carved bone beads.    I was pretty excited!   Special handmade beads from another artist to compliment a handmade runner, just what the runner needed for that finishing touch.  When the beads arrived I laid them out on the runner that I was almost finished weaving and knew it was definitely the perfect accent! 

img_6835

Once I was finished weaving I began the long and difficult task of adding the beads to the fringe of the runner.   

img_1062d

Adding the beads to the finished runner was a long and tedious task but definitely worth the work, time and effort when I saw the finished project!!  Once the beading was finished all that was left was to do the finishing wash and block drying and trimming off any overlapped threads in the weaving.  

I love how the runner turned out!  I feel it definitely has the look and feel of the inspiration photo.  This runner would look beautiful with many types of dishes or pottery.  Here is an example…..

img_6885

Another picture of the finished runner….

img_1059

After I finished this runner I decided to make this same style in a couple more colors.   In a future post I will show some pictures of those finished runners too.  

I actually had some beautiful brass and bone beads leftover from my weaving projects so I made those into some fun jewelry pieces .  I’ll have some pictures of those in my next blog post.  

So that’s about it for this post.    Hope this article inspires you to make something beautiful!   Until next time….

DSC01768

…I wish you Peace.

SOMETHING NEW….

Turning plain white Tyvek paper into these colorful beads!!

img_0654

My latest project has been making these beautiful paper beads.  Just the kind of project my happy painting fingers were ready for!  I had been watching several videos online about making these beads and decided I definitely wanted to make some, so I ordered 20 sheets of Tyvek paper from Amazon.  I did see that several of the people in the videos also used Tyvek envelopes that they had saved from something they received in the mail or from a friend that had recently put insulation on their house and had some of the extra tyvek paper.  I was very surprised at how strong this paper is, I couldn’t even tear it!  But it did submit to the coaxing from my heatgun to make some very interesting shapes! 

To begin making these beads I first crumpled the paper up, then flattened it back out for painting.  I knew that would add some dimension as I painted these white sheets of Tyvek with several colors and layers of acrylic paints.  I made sure to add in some glitz by painting on some metallic gold paint as you can see from these pictures.

0b2b052d-5481-43b3-8217-1a122ae2208c

f5d153f0-d5a3-4e1c-ad37-7adbdd9bbb1d

After I painted the front side I let it dry and then I also painted the backside.  Once the paper was completely dry on both sides, I cut it into strips.  Some of the strips I cut into long triangle shapes, some I cut into other various shapes and sizes.

img_0522img_0616img_0575

Then the fun began!  Using only one strip at a time I wrapped the painted paper onto a dowel ( I used several sizes of dowels to get the different sizes of beads).  Once the strip was wrapped onto the dowel I pinned it with a straight pin to hold the strip of paper in place.  

img_0600

Once I knew the paper was well secured I used my heat gun to begin “melting” the paper strip to itself and help it to create textures and curls in the “bead”.  

Here are the beads that I ended up making…

For the beads pictured below I laid beads on the paper that the strips for them had been cut.  As you can see the color of the beads can sometimes look very different from the way that the paper had been painted.

As you can see from the pictures I made a lot of beads!  The process was very fun and addictive!   It was always fun to see what the result would be from the heat being applied to the painted paper and to see what the shape of the bead would be from the way I had cut the strips.

I am already picturing all the fun things I want to make using these beads!  Definitely jewelry and I have a few other fun things in mind that I would like to try!

 I hope you enjoyed seeing how these beads were made and will drop back in for a visit when I post the pictures of the resulting art pieces made from these beads!

Until next time……

DSC01768

…..I Wish You Peace


Hand Painted Jewelry

Impressionist style painting……

img_8604

I love the freedom that modern impressionistic painting with fluid Acrylics and Alcohol Inks brings to the canvas.  The abstract designs lend themselves to so many applications.

Recently, I have not only painted in this style to make artwork to hang on the wall, but have also been making other art pieces like these jewelry items…

img_0146

I have been making necklaces, earrings, rings and even bracelets!

img_0286

Some of these were painted using acrylic paints and some were made using alcohol inks.

I love the many feelings and styles of this jewelry so I decided to name the lines of jewelry that were made from each of the particular canvas.  Here is a list of some of the names I came up with….

Slice of Nature, Mesa Verde, Gold Rush, Dragon’s Lair,  Under The Sea and Autumn Splendor.

img_0385

Here is an example of how the process to make these beautiful pieces begins.  First I must decide the additives I will use with my acrylic paints to get the desired effect in my painting.  This took me quite a while to work out my favorite 2 or 3 formulas.

Once I decide on the formula, I then decide whether the application of the paint will be on Canvas or Yupo paper.

 Once I even took some of the leftover paint and splashed it on these little cups.  No paint ever goes to waste!

 Here is an example of how some of the paintings turned out before making them into jewelry.

The process of making the jewelry is a test of my patience for sure as once the painting is finished I have to allow the artwork to cure for 2 to 3 weeks.  It’s hard to have to wait that long to see my finished pieces.  Once the paintings are cured I then clean and dry them which takes another 2 to 3 days.  To give the artwork a beautiful finish I add 3 coats of sealer to them.

img_9628

The above picture shows some of the pieces I made using Alcohol Inks, these are part of my Autumn Splendor Line.

img_0285

The above bracelet with several round pieces is from my snap jewelry.  I have made additional pieces in a variety of colors, so the artwork on these is interchangeable.  Meaning a person can take these 5 round pieces off and put different colored snaps in their place.   Being able to change out the round pieces makes this jewelry very versatile, I love that aspect of this style.

This is how the pieces work.  As you can see it is a lot like an actual snap.  And it really is that easy to change them out!  How fun is that?!

*******

Another  project I just finished were my new business cards……

I am so please with how they turned out!!  What do you think??

******

Well it’s time to get back to work on my new studio spaces, so I will end this post.  I  look forward to our next coffee break and bringing you up to date on the latest adventures here at the Art Pod.

Until next time……

….I wish you Peace!


FRIENDSHIP…..

Friends Are The People Who Know The Words To The Song In Your Heart……

IMG_2527

I am so fortunate to have had many friends in my life that definitely know the words to the song in my heart.  And something that makes me very sad is when one of them is going through something difficult in their lives.  You know that you can’t “fix” it for them but all the same you somehow want to help build them up and encourage them that they will get through this hardship.

Today I wanted to share a weaving project that was meant to do just that.  A friend of mine was going through something tough and was feeling pretty discouraged and I began to try to think of something that might cheer her up.  

I decided I wanted to try to weave something colorful and cheerful for my friend.  I was just finishing up a project on one of my floor looms that had some leftover dark brown cottolin warp threads, so I decided to try an experiment.  This purse was the result of that experiment. 

IMG_2529 

 I knew my friend loved very colorful things so I knew that the purse would need to have lots of color.  I went through a bunch of leftover yarns that I had from other projects and made a pile of them by my loom and then began weaving random  patterns.    This is how it looked on the loom during the weaving process.     

IMG_2451

There was no rhyme or reason to how I laid the colors or patterns out, this was just random treadling and colorful playing in my threads.

IMG_2449

I really did not even try to repeat or keep track of any of the patterns I was weaving.

IMG_2442

Once I felt like I had a big enough piece woven to make a small purse I stopped weaving.  Of course I also stopped because I ran out of warp 🙂

At this point I really wasn’t quite sure if this was going to look like the cute little purse that I had envisioned.  I did the finishing wash and waited for it to dry to see if this was going to be a big enough piece to make the purse.

IMG_2452

During this same time period I had been experimenting with dyeing some silk scarves.  I went through some of my finished pieces and picked this one to use for the lining of the purse.


image

As I began the construction of the purse I decided it definitely needed some

IMG_2525

embellishments, so I added the mirrored and hand buttonhole stitched circles and the scroll that I had made by crocheting together multiple threads.  I added a button and closure threads that had been braided and sewn into the flap.  

I twisted a bunch of the leftover weaving threads together, putting a knot at each end to make a tassel, and hand sewed it onto the purse for the strap.

IMG_2531

Before sewing the lining into the purse I stamped it with this friendship saying and the music notes on each side.   I heat set the printing to make sure it was permanent.  

IMG_2533

My experiment was now complete and I was anxious to wrap it up pretty and give to my friend.  

IMG_2529

I was so glad to have something to give to her that I had handmade to brighten her day.  She is still very much in my daily thoughts and prayers.  Even though we now live many miles apart we still keep in contact and are still a part of each others lives.   

I hope this article inspires you to make something beautiful, and treasure your friendships! 

Until next time……..

DSC01768

….I Wish You Peace.


THE START OF A NEW ADVENTURE…..

ART POD STUDIOS moves to Nashville, Tennessee!

img_8735

It was hard to believe…..

img_9820

…it was finally all packed!!

img_8741

And we were headed to our new home and studio space in Nashville!!

****

AS YOU CAN SEE from this picture of our new place in Nashville, it is going to be quite a bit of work transforming some of this space into studios.  This is the area where Studio I will be.    

img_8066

We are slowly making progress on transforming this into an area where I will be doing a lot of weaving on my floor looms.

img_8210

Once the painting was done we started moving supplies and equipment into the studio.  It still needs lots of tweaking and organization to get the studio up and running but I can now envision the metamorphosis of this studio into a great creative space.    

img_8209

More shelves put together and getting lots of fibers unpacked.  

img_8207

And would you believe it more fibers!!

img_8827

I’m sure like many other artists I am surprised at just how many fibers and supplies I have in my stash!  

img_8287

It’s been fun going through all this stuff and being reminded that I have some really cool books and videos I had almost forgotten I had.    I love rediscovering them all over again!

img_8284

I still have a long way to go in getting this Studio space ready to use but I am feeling like I am making lots of progress.   Once it is finished I will post some more pictures of the finished room.  

img_8286

I know this Studio will be in progress for quite a while yet as I am feeling that I may need to repaint the room again.  I painted it with a white medium quality paint and instead of it looking white it looks Peach.  Not at all what I wanted!  So back to the drawing board as they say….  

I have started work on Studio II and it is almost finished.  Next week I will show the before and after pictures.  I’m definitely loving the way it turned out!!

***

Thanks for stopping by and taking a look into what Art Pod Studios is up to these days.  I will soon have some postings on what art projects I have finished recently.  

Until next time…..

DSC01768

…..I wish you Peace.

At The Loom – Purse Project

Last post I gave a hint about the next project I was starting to work on and the following is an update on how that project is going.  I started out with this gorgeous  hand dyed warp thread I got from Robinjedmundson on Etsy.

IMG_0546I decided it would be cool to make a purse using this colorful rayon warp by combining it with a cotton weft.    For the weft I used a mercerized cotton flake yarn.   I felt that this combination of fibers would give the cloth enough body to make a purse.

I warped up the loom with a combined twill pattern using a 15 dent reed.  The loom was warped with 130 threads (this included the 2 float threads).

IMG_0594Because I had already done this pattern once with the same number of warp threads for another project … 

IMG_0587 I just tied the new warp onto the old warp and pulled the threads through the reed and through the heddles instead of having to thread all of them from scratch.  

IMG_0597This process saves lots of time if you are making the same pattern several times but want to do different colors.

IMG_0595

I wove using a mercerized cotton flake yarn in a dark teal color for the weft.

IMG_0609

I really love the play of colors in this dyed warp combined with the dark teal weft.

IMG_0624

Here is a close up picture of the interplay of colors in the pattern.

IMG_0615

The Weaving progressed very nicely, and the fibers were a joy to work with.

IMG_0673

The colors did not show up very well in this picture but this is the piece as it was being taken off the loom.

IMG_0689

And this is the piece laid out before finishing.

IMG_0680

Once I did the finishing wash, dry and cutting off of the spliced in weaving tails,  the finished cloth measured about 7 inches wide, and 64 inches long.  I cut the fringe on one end 4 inches long and at the other end I cut it 9 inches long.

The end of the cloth that has the shorter fringe will be the top flap of the purse, and the longer fringe will be at the bottom of the purse.

I decided to add some copper and beading embellishments to the shorter fringe that will be on the top front flap of the purse.

IMG_0958

First I strung some beads and added them.

IMG_0951Then I flattened some pennies and textured one,

IMG_0739

domed another and added more copper accents by twisting some copper wires and flattening them.IMG_0738

I am also considering adding these items……

IMG_0977


Using  this purple perle cotton, I thought I would add these beads by sewing the thread in and out of the fabric so that it shows through on top while tacking down the beads at the same time.  I also though I would use some of these purple beads (right side of the picture) to add a few more strands of purple accents in 2 or 3 other places along the fringe.

IMG_0933

I feel the purse is progressing nicely and I have several ideas already on how I want to piece it together.  I don’t have very much of the warp thread left, but there is enough to add some into the inkle band that I am going to weave for the purse strap.

….So for now, it’s back to the loom….

Thanks for dropping in, hope this project inspires you to make something beautiful today!!

Until next time…..

DSC01768

                  ….I wish you Peace

SHIMMERING SCARF FINISHED!

Image

Do you remember that beautiful shimmering warp I posted about last week?  Well, it just turned into an even more beautiful shimmering scarf !!  This is the finished scarf.

 I thought you might like to see some pictures of the scarf being woven so here are a few.

Image

After I added the warp to the loom then the weaving process began….

IMG_0517

…and the twill pattern began to show through the woven threads.

IMG_0501

This picture shows the texture of the twill weaving.

Image

I love how this zig zagging textured twill pattern looks intermixed with the bands of plain weave.Image

Time to cut the woven scarf off the loom and start the finishing process.

Image

I wove the scarf about 98 inches long but as expected it did shrink a little in the finishing wash.  But before I washed it I tied the fringe at each end of the scarf.

Image

This is how the scarf looked after it was washed, air dried, then fluffed in the dryer.

It has a very fluid and silky drape.

Image

I love how my shimmering scarf turned out!

Here is a sneak peek at my next project going on the loom.  I will be using these beautiful hand dyed skeins of rayon yarn to make another twill patterned scarf.

IMG_0549

 I purchased this beautiful yarn on Etsy from the vendor  –  robinjedmundson.etsy.com

 IMG_0594

Guess it’s time to get back to the loom and warp up another project !

 Until next time….

DSC01768

                   …..I wish you Peace